How we tested it
In short
The usual way of grading a detector gave all six of our attempts almost the same result — about 0.995 out of 1. That told us nothing about which was better.
So we tested differently: we deliberately ruined the test photos the way real flying ruins them — turned sideways, pad shrunk to a few pixels, motion blur — and asked which model still coped. That separated them immediately.
Later, running on the actual camera, we found something no laptop test could have shown.
Why the usual grade was useless
After re-sorting the pictures we trained the old settings again as a baseline. It scored 0.995. The new settings scored 0.995. So did the other four attempts.
The grade had run out of room. Our grading pile is 16 photos of one high-contrast pad on a clean floor — too easy for the difference between two models to show up at all.
So we made our own tests, based on what actually happens in flight:
A drone does not hold a fixed heading, so the pad arrives at the camera rotated. We rotate the photos, and rotate the marked outlines with them so the correct answer stays exact.
Higher up means fewer pixels on the pad. We shrink the whole photo onto a floor-coloured background, which makes the pad small in exactly the way climbing does.
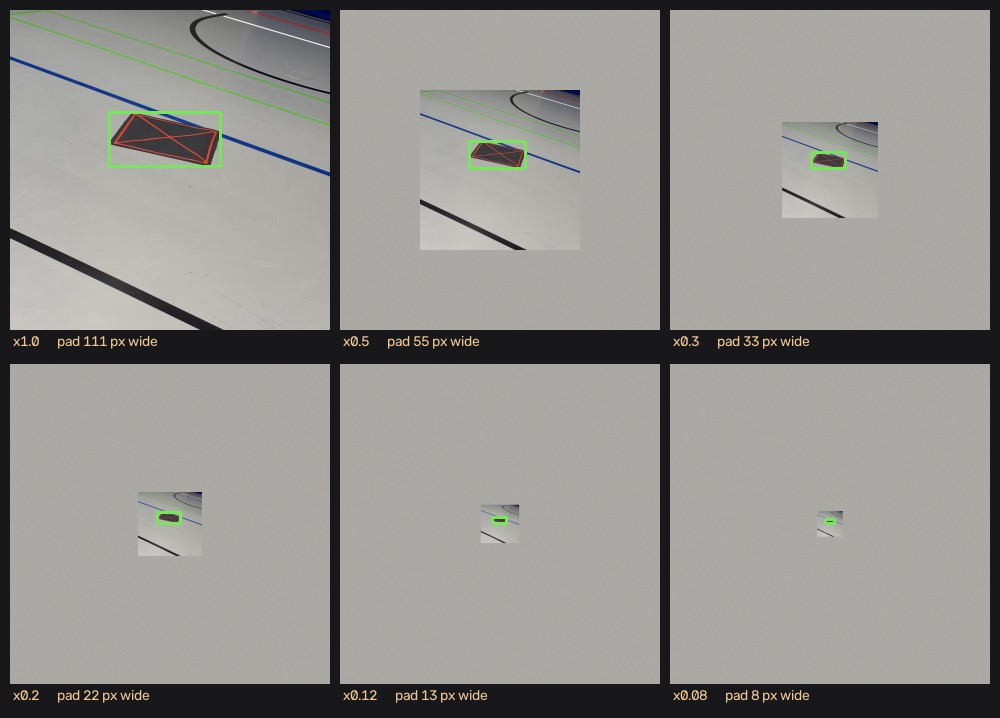
The limitation of the method is also visible: the surroundings shrink with the pad and are replaced by flat floor colour. A real photo taken from higher up would show more floor, more lines, more clutter. The test makes the pad small honestly; it does not reproduce everything else about being higher up.
Motion blur from the propellers, sensor noise, and compression — applied at the size the model actually sees.
Height: where the old settings broke
How often the model finds the pad as it gets smaller in the picture. 1.00 means it
found every one.
| Pad width the model sees (median) | 296 px | 148 px | 89 px | 59 px | 35 px | 24 px |
|---|---|---|---|---|---|---|
| A (old settings) | 1.00 | 1.00 | 0.81 | 0.69 | 0.50 | 0.25 |
| D (new settings) | 1.00 | 1.00 | 0.94 | 0.81 | 0.75 | 0.62 |
| F (what we use) | 1.00 | 1.00 | 1.00 | 0.94 | 0.81 | 0.69 |
The old settings lose half their detections by the time the pad is 35 pixels across. The model we deployed still finds four out of five.
The cause is in the pictures, not the training: the typical training pad fills 78 % of the image width, because every photo was taken standing next to it.
The pixel row is a median, and the set is split in two
The 16 grading photos are not one population. Ten of them are close-ups — the black-background shots and the office ones — where the pad fills 89 to 99 % of the frame. The other six are hall photos, where the pad is between 9 and 66 %, median 80 px.
So the hall photos already start where the close-ups only arrive after shrinking by about a third. The illustration above is one of the hall photos, which is why its pad is 111 px and not 296. When reading the table, remember that the columns to the right push the hall photos into single-digit pixel sizes long before the close-ups get there.
What these sizes mean in flight
The camera's lens covers 66° across, so how big the pad looks follows directly from how high the drone is. Taking the pad as roughly a metre across, and using the deployed model's own numbers from the row above:
| Shrink factor | Pad fills | Same as flying at | F finds it |
|---|---|---|---|
| ×1.0 | 92 % | 0.8 m | 1.00 |
| ×0.5 | 46 % | 1.7 m | 1.00 |
| — | 38 % | 2 m: the search height | between the two rows above: 1.00 |
| ×0.3 | 28 % | 2.8 m | 1.00 |
| ×0.2 | 18 % | 4.2 m — about the indoor limit | 0.94 |
| ×0.12 | 11 % | 6.9 m | 0.81 |
| ×0.08 | 7 % | 10.4 m | 0.69 |
The drone cannot fly high enough to reach the weak part of this table. It searches at 2 m and may not exceed 4 m indoors: the top half of the table. The bottom two rows describe heights this aircraft never reaches.
That does not make the test pointless: it is what chose the settings, and it is the right test for any future outdoor use. It does mean the weakness should not be read as a problem for the current mission.
All five attempts, at every size
| ×1.0 | ×0.5 | ×0.3 | ×0.2 | ×0.12 | ×0.08 | |
|---|---|---|---|---|---|---|
| Median pad size (px) | 296 | 148 | 89 | 59 | 35 | 24 |
| A (old) | 1.00 | 1.00 | 0.81 | 0.69 | 0.50 | 0.25 |
| B | 1.00 | 1.00 | 1.00 | 0.94 | 0.69 | 0.56 |
| C @416 px | 1.00 | 1.00 | 0.94 | 0.81 | 0.38 | 0.00 |
| D | 1.00 | 1.00 | 0.94 | 0.81 | 0.75 | 0.62 |
| E | 1.00 | 1.00 | 0.88 | 0.62 | 0.69 | 0.62 |
Everything at once: a real approach
Rotated and far away and blurred, which is what the camera sees coming in.
| rotated 45°, distant | + blur | rotated 135°, further, everything | rotated 90°, furthest, everything | |
|---|---|---|---|---|
| A (old) | 0.44 | 0.44 | 0.06 | 0.00 |
| D | 0.94 | 0.94 | 0.50 | 0.69 |
The old settings reach zero on the hardest case — it finds nothing at all. This is the table that chose the settings. The usual grade could not have.
False alarms on empty pictures
The test that changed which model we ship. 91 pictures with no pad in them, none of which the model had seen:
| False alarms per picture | Finds real pads | Finds distant pads | Worst confidence on an empty picture | |
|---|---|---|---|---|
| A (old settings) | 0.02 | all | 0.81 | 0.55 |
| D | 0.33 | all | 0.94 | 0.87 |
| F (what we use) | 0.02 | all | 0.94 | 0.66 |
The full story is on the Training page. The short version: D was confidently wrong about empty rooms, and no threshold could have caught it.
What shrinking the model costs
The model has to be shrunk to run on the camera chip. We measured the cost rather than assuming it:
| Finds the pad | Draws a tight box | |
|---|---|---|
| Full size, on a laptop | every time | 0.81 |
| Shrunk for the Pi's processor | every time | 0.68 |
| Shrunk for the camera chip | every time | 0.67 |
Shrinking costs nothing in finding the pad. It only makes the box a little looser.
Careful: this was simulated, not measured on the camera
These numbers come from running the shrunk model on a laptop. It is a good stand- in for what shrinking does to the model, and the next section is where it stops being a good stand-in for the real camera.
The stress tests, full model vs shrunk
| Test | Full size | Shrunk |
|---|---|---|
| Rotation, worst case | 0.94 | 0.94 |
| Height, worst case (24 px pad) | 0.69 | 0.69 |
| Blur / noise / compression | 1.00 | 1.00 |
| Everything at once, worst case | 0.62 | 0.69 |
| mAP50 | 0.995 | 0.995 |
Choosing how sure the model has to be
The model reports a confidence with each detection. Below a chosen threshold we throw the detection away. Where to put the threshold:
| Threshold | 0.25 | 0.40 | 0.50 | 0.60 | 0.70 |
|---|---|---|---|---|---|
| False alarms per picture | 0.03 | 0.03 | 0.02 | 0.00 | 0.00 |
| Finds real pads | all | all | all | 0.94 | 0.81 |
| Finds distant pads | 0.94 | 0.88 | 0.88 | 0.75 | 0.56 |
0.50 is nearly free. It still finds every pad in the grading pile, and costs one distant pad in sixteen compared with a much lower threshold. Going to 0.60 is where it starts genuinely missing things.
What the real camera does differently
The laptop simulation is honest about whether the model finds the pad. It is not honest about how sure the model says it is.
On the actual camera chip, confidence only ever comes back in fixed steps of about 0.06:
Two things follow, and no laptop test could have shown either:
The threshold only has about nine usable settings. Choosing 0.30 and choosing 0.35 are the same choice — both let the 0.32 step through and there is nothing in between.
The lowest step is where the rubbish is. In a live test at threshold 0.3, every nonsense detection sat at exactly 0.32: boxes stuck to the edge of the frame, long thin shapes no pad could make, each lasting a single frame. The real pad sat at 0.50 to 0.78 and stayed there for dozens of frames in a row.
So the table above and the real camera agree, for different reasons: use 0.50.
Time separates them better than confidence does
The false detections occurred singly; the correct ones persisted. Requiring the pad to appear in three of four consecutive frames in approximately the same position removes the noise entirely. A landing controller should not act on a single frame in any case.
Throwing away impossible shapes helps too: anything longer than about 1:3, or touching the edge of the frame, cannot be a pad seen from above.
The scripts
| File | What it does |
|---|---|
compare.py |
grades, broken down by pad size and by room |
robustness.py |
the rotation / height / moving-camera tests |
fp_bench.py |
false alarms on pictures with no pad |
person_bench.py |
how well the combined model spots people |
pad_pose.py |
outline, centre and angle of a confirmed pad — written, not used by the mission |