Setup Board Computer
This section looks at how we are able to connect our board computer, in our case a Raspberry Pi Zero 2 WH, to our flight controller. First off, there are multiple possibilities to set up a board computer to work with a flight controller. For example there are prebuild operating systems we could install, like BlueOS, Rpanion-Server or APSync and multiple programms that allow us to use the MAVLink protocol, such as MAVProxy, DroneKit, MAVSDK or mavlink-router. As we are constrained in using a Raspberry Pi Zero, we will use the lightweight mavlink-router for our project. An overview about the most common ways to use a Raspberry Pi with ardupilot can be found under https://ardupilot.org/dev/docs/raspberry-pi-via-mavlink.html.
Install OS & Enable SSH
Use the Raspberry Pi Imager to flash Raspberry Pi OS onto your primary server storage. Ensure SSH is enabled during the customization step.
If SSH needs to be enabled manually later via terminal, use:
Accessing the Pi through SSH can be done through the following commandsEnable persistent logging
By default, the Raspberry Pi will save all logs into RAM under /run/log/journal, which is not retained upon reboot. As we will need to look into error messages in case something goes wrong, we will first change our setup, so the log messages will be saved on our persistent storage. To do that we will have to change our journal.conf file. Normally the file would be saved in /etc/systemd/journald.conf, but for some reason the Raspberry Pi OS stores the needed file in /usr/lib/systemd/journald.conf.d/40-rpi-volatile-storage.conf, that overrides the journald.conf file. Inside that file we change the Storage option to persistent and if needed, add a maximum file size. It should look something like
/etc/systemd/journald.conf.d/ that has a prefix higher than the 40 that in 40-rpi-volatile-storage.conf. The new file will then be loaded last and overwrites the other file.
sudo mkdir -p /etc/systemd/journald.conf.d/
sudo touch /etc/systemd/journald.conf.d/99-persistent-journal.conf
After our updates we can restart the journald process
and if we want to write the logs already written onto RAM into our persistent log, we can use:To see if everything worked, we can use
and we will see something like:
The directory /var/log/journal/ should have been created and the logs will be saved on the persistent storage.
We will go over the most important functions of the journalctl command:
- Just using
journalctlwill display the recent log messages from all units starting from the most recent entries - -r: Reverses the log order.
- -n: Specify a specific number of log entries to be shown.
- -f: Continuously print new entries when they are appended to the journal.
- -u: Display logs for a specific systemd unit or service.
- -p: Filters the output by message priorities.
- "emerg" (0)
- "alert" (1)
- "crit" (2)
- "err" (3)
- "warning" (4)
- "notice" (5)
- "info" (6)
- "debug" (7)
- --list-boots: View information about system boots.
- -b: Show messages from a specific boot, for the last boot use
journalctl -b -1. - -g: Filter Message field that matches specified regular expression.
- -o verbose: shows the full-structured entry items with all fields.
See all options under https://man7.org/linux/man-pages/man1/journalctl.1.html
Setup USB
It is possible to access the Raspberry Pi using ssh through the USB port. This is called the USB Gadget Mode, where the Pi is emulating an USB Ethernet adapter. It is important to note, that we have to use the middle USB connection of our Pi zero 2, as this port allows or data transfer.
In our Bootfiles we have to change the config.txt and cmdline.txt.
In config.txt we have to add the line
dtoverlay=dwc2,dr_mode=peripheral
at the very bottom, and in cmdline.txt, we add
rootwait in the first line of the file. Do note, that there should not be any newlines in the file, everything has to be on the first line.
After those two changes, Linux and Mac computers should already be able to access the Raspberry Pi using the USB connection, but for Windows we might need to install the Pi RNDIS Driver, before we can access the raspberry Pi, as it might be shown as normal port.
Setup Tailscale
Tailscale is a mesh Virtual Private Network(VPN) service, that allows us to connect computers, like our Raspberry Pi, severs, cloud instances and other devices to another, no matter in which Network they are, as long as they have Internet access, by building a private and encrypted peer to peer network that is called tailnet.
To use Tailscale we need need a Tailscale account we can create under https://tailscale.com/, and after adding our first device, we can install Tailscale on our Raspberry Pi using the command:
Running tailscale up, will show a link, which we can use to register the device under our Tailscale account, that allows us to access the Raspberry Pi using the Tailnet, even when the devices are in different Networks. We just have to run the ssh command using the IP provided by Tailscale.Configure serial port on pi
We have to set up our Pi to allow the use of the serial ports we need, as the Raspberry Pi Linux uses the hardware serial pins GPIO 14 and GPIO 15 for a Linux console login shell, which blocks mavlink-router from reading the pins. To do that we use the command
This will open the following window, where we will navigate to Interface Options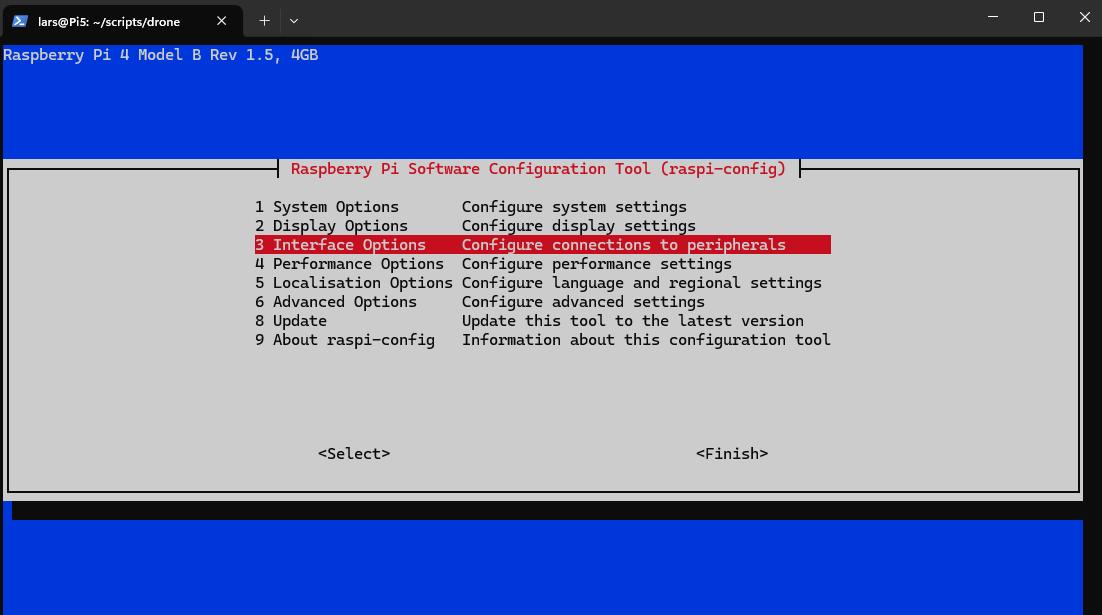
and then to Serial Port.
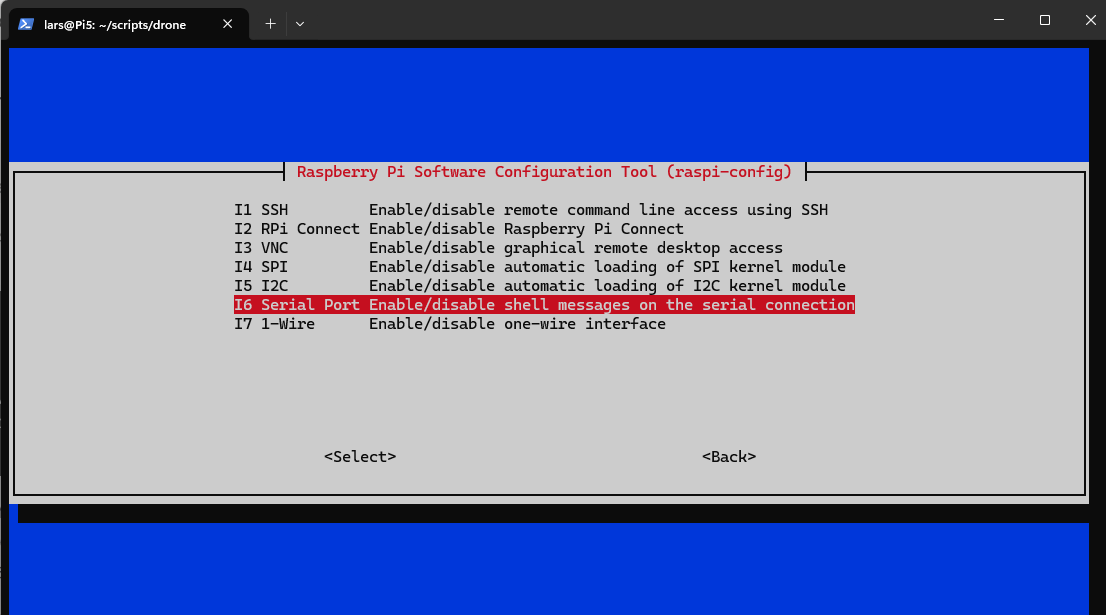
It will ask: "Would you like a login shell to be accessible over serial?", where we will select No

and it ask: "Would you like the serial port hardware to be enabled?" directly after, where we will have to select Yes.
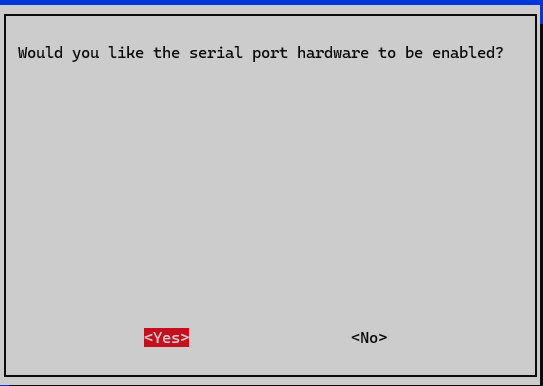
We save our changes, exit and reboot the Pi, which allows us to use the hardware serial pins for our MAVLink protocol.
Setup Hotspot
It is possible, that we do not always have access to WiFi, and we might not be able to access the board computer using a wireless Network, and while flying, accessing the Pi using a USB cable might not be ideal.
For that Reason we will let the Raspberry Pi create a hotspot we can access using our laptop, in case it does not have access to another WiFi Network.
To do that we first use the Netork Managers command line interface(nmcli) to create a new Hotspot connection:
sudo nmcli connection add type wifi ifname wlan0 mode ap con-name Hotspot ssid MyPiHotspot autoconnect no wifi-sec.key-mgmt wpa-psk wifi-sec.psk "Password123"
connection addinstructs the Network Manager to create and save a new network profiletypespecifies what type of connection we want to use, in our casewifiifnamespecifies the interface name, which is a physical or virtual network device. We want to bind our connection to our built-in Wi-Fi adapter, which is namedwlan0.modeis an alias for the property802-11-wireless.mode, and the optionapsets this mode to Access Point, making the wireless card act like a Wi-Fi router that is broadcasting a network, and allows us to connect to it.con-namespecifies the internal name of this network profile.ssidsets the broadcastname that is visible to other devicesautoconnect noThis prevents the Pi from automatically starting the Hotspot. As we generally want to access a known WiFi connection instead.wifi-sec.key-mgmtis the property802-11-wireless-security.key-mgmt, that specifies the authentication framework that the network will use, in our case we are usingwpa-psk, that sets the mechanism to WPA Pre-shared key, that is the password-based security standard, generally used for home usage.wifi-sec.pskis a short form of the Property802-11-wireless-security.pskthat specifies the Pre-shared key, the actual passphrase. The actual password then is the following String, here as Example given as "Password123".
After we set up the Conncetion Profile, we still want it to open the Hotspot, after it failed to set up another WiFi connection. To do that we will create a systemd service, that waits a little while, so it allows for automatic connection to known WiFi networks, and launches the Hotspot in case no connection has been found.
A systemd service, or daemon, is a type of background process that systemd is responsible for starting, stopping, and monitoring.
First we create a script that our service will use
The contents of the script are#!/bin/bash
# Give Wi-Fi hardware a few seconds to initialize
sleep 10
# Force a Wi-Fi scan for visible SSIDs
sudo nmcli dev wifi rescan
# Check if currently connected to any Wi-Fi network
ACTIVE_CON=$(nmcli -t -f TYPE,STATE dev | grep "wifi:connected")
if [ -n "$ACTIVE_CON" ]; then
echo "Successfully connected to home Wi-Fi."
exit 0
else
echo "No Wi-Fi connection found. Launching Hotspot..."
sudo nmcli connection up Hotspot
fi
[Unit]
Description=Automatic Wi-Fi Hotspot Fallback
After=NetworkManager.service
Wants=NetworkManager.service

[Service]
Type=oneshot
ExecStart=/usr/local/bin/autohotspot.sh

[Install]
WantedBy=multi-user.target
- The unit section: The unit section defines the metadata for services and tells systemd when in the boot sequence the process is started
- Description: Label(Name) for the service.
- After=NetworkManager.service: Defines which services have to run earlier, as we only want to create a Hotspot after we made sure there are no other WiFi connections, we let our service run after the Network Manager.
- The service section: Defines how the script is executed and managed.
- Type: The Type defines how the startup process is managed and how systemd determines when the service is fully up and running.
oneshotis gererally used for single-run tasks and systemd waits for the process to fully complete before marking the unit as started or moving to dependent sevices. - ExecStart: Points to path of the bash script. Systemd will execute this command when starting the service.
- The install section: Defines behaviour upon running
sudo systemctl enable, for the service, meaning what happens after it is enabled. - WantedBy: This directive specifies the relationship between this service and other services.
multi-user.targetis the state where the system can accept multiple non-graphical user sessions.
Lastly we enable the service using the two commands
Setup the flight controller
While we already set the needed options in the setup section of our drone, we will repeat the needed settings for our flight controller to be able to work with our board computer. We need to set the following parameters, do note that for our setup we need to set the options for serial port 4, this might be different for other configurations:
SERIAL4_PROTOCOL= 2 to enable MAVLink 2 on the serial port.SERIAL4_BAUD= 921 to set the 921600 baud rate.LOG_BACKEND_TYPE= 6 only if we also want to stream logs to the Raspberry Pi: 6 = the FC's own dataflash memory (4) plus MAVLink streaming (2). The default 4 (dataflash only) is fine otherwise. Do not use 1 or 3 — the "File" backend needs an SD card slot, which the Flywoo GOKU GN745 does not have (it logs to a 16 MB SPI flash chip).
Connect the flight controller with the board computer
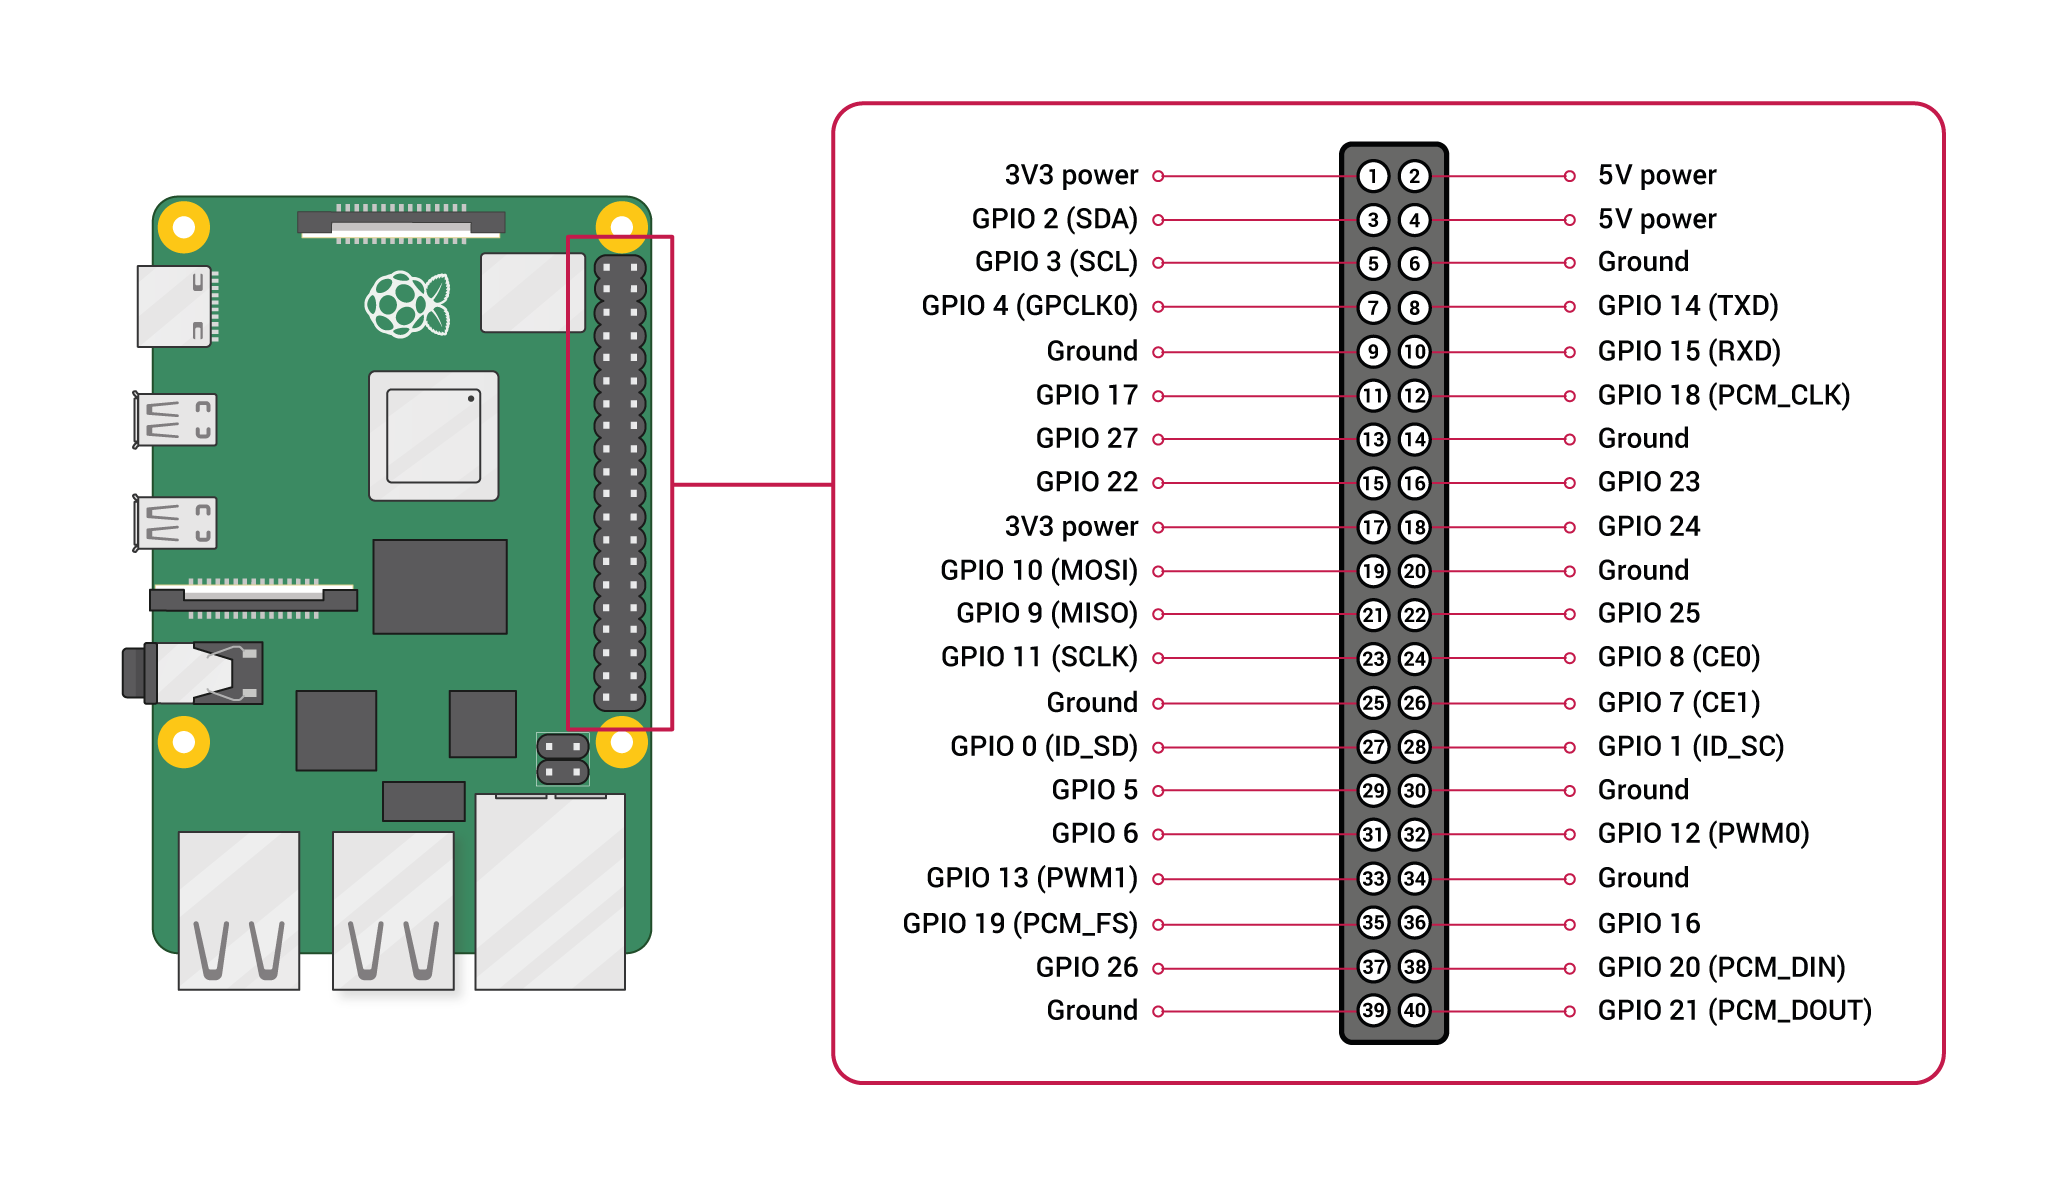
To connect the flight controller and the board computer, we have to connect the Raspberry Pi's TX pin (GPIO 14/Pin 8) to the RX pin of the flight controllers, the RX pin (GPIO 15/Pin 10) of the Pi to the TX pin of the flight controller and make sure they have common ground by plugging setting the ground of the flight controller to the ground of the Pi. Make sure that you only ever power the Pi using either the drones battery, or the usb-c port, as using both might damage the board. The GPIO serial port is called /dev/serial0 on our Pi.
Install MAVLink-router
MAVLink(Micro Air Vehicle Link) is the standard communication protocol used by autopilots to talk to ground control software and companion computers, like our Raspberry Pi. We look at the basics of the MAVLink format in Mavlink Basics
We need a program that listens for MAVLink traffic on one port and forwards it to others. We use mavlink-router for this: https://github.com/mavlink-router/mavlink-router
The packages that we need to install mavlink router are
If we have all packages installed we can download mavlink-router, run the meson build inside our downloaded folder and compile and install the files, the -j option denotes the number of parallel jobs. We use only one, because multiple jobs on 4 cores of our pi zero can fill up the ram fast and coorupt the image. After we installed everything, we will create the config file we will need. To see an example of the config file we can look at the official github page https://github.com/mavlink-router/mavlink-router/blob/master/examples/config.sample where we can see all possible options. For now we will only look at the basic options we will need for communication via MAVLink to our flight controller, but it also allows for options that allow us to easily log data from our flight controller, if we wish to save the logs on our board computer. The File should contain the following:[General]
# Basic configuration
ReportStats=false
MavlinkVersion=2.0
[UartEndpoint flightcontroller]
# Connects to FC via GPIO hardware serial pins
Device = /dev/serial0
Baud = 921600
[UdpEndpoint local_script]
# Routes data to port 14550 for Python scripts running on the Pi
Mode = normal
Address = 127.0.0.1
Port = 14550
[UdpEndpoint ground_station]
# OPTIONAL: Routes data over Wi-Fi to a Ground Control Station (GCS)
# Replace with your laptop's actual IP address on the network
Mode = Normal
Address = 192.168.1.50
Port = 14550
[Unit]
Description=MAVLink Router Service
After=network.target

[Service]
Type=simple
ExecStart=/usr/bin/mavlink-routerd -c /etc/mavlink-router/main.conf
Restart=on-failure
User=root

[Install]
WantedBy=multi-user.target
sudo systemctl daemon-reload
sudo systemctl enable mavlink-router
sudo systemctl start mavlink-router
To see if the service is running we can use
Once mavlink-router is up and running, we can directly listen to the serial port to see if packets are arriving We will see seemingly random characters scrolling on the screen, which tells us that the flight controller is actively broadcasting
Pymavlink
Pymavlink is a Python implementation of the MAVLink protocol, that we will use to send MAVLink commands to our flight controller. First we need to install some packages:
sudo apt-get install libxml2-dev libxslt-dev
sudo apt install python3-pip
sudo python3 -m pip install --upgrade lxml --break-system-packages
import time
from pymavlink import mavutil

# Connect
connection = mavutil.mavlink_connection('udpin:127.0.0.1:14550')

# Wait for the initial heartbeat
print("Waiting for heartbeat...")
connection.wait_heartbeat()
print(f"Connected to System {connection.target_system} Component {connection.target_component}")

# Request Data Streams
connection.mav.request_data_stream_send(
    connection.target_system,
    connection.target_component,
    mavutil.mavlink.MAV_DATA_STREAM_ALL,
    4, # 4 Hz
    1
)

# Read incoming data loop
last_heartbeat_sent = 0

try:
    while True:
        # Periodically send a heartbeat back to flight controller (1 second)
        # to let ArduPilot know the script is still active
        if time.time() - last_heartbeat_sent > 1.0:
            connection.mav.heartbeat_send(
                mavutil.mavlink.MAV_TYPE_GCS,       # Tell FC you are acting as a GCS/Companion
                mavutil.mavlink.MAV_AUTOPILOT_INVALID,
                0, 0, 0
            )
            last_heartbeat_sent = time.time()

        # Try to receive a single message
        msg = connection.recv_match(blocking=True, timeout=0.1)

        if msg is None:
            continue

        # Filter and look for the specific data types
        msg_type = msg.get_type()

        if msg_type == 'ATTITUDE':
            print(f"Attitude -> Roll: {msg.roll:.2f}, Pitch: {msg.pitch:.2f}, Yaw: {msg.yaw:.2f}")

        elif msg_type == 'GLOBAL_POSITION_INT':
            print(f"GPS -> Lat: {msg.lat / 1.0e7}, Lon: {msg.lon / 1.0e7}, Alt: {msg.alt / 1000.0}m")

        elif msg_type == 'VFR_HUD':
            print(f"HUD -> Airspeed: {msg.airspeed} m/s, Throttle: {msg.throttle}%")

except KeyboardInterrupt:
    print("Script stopped by user.")
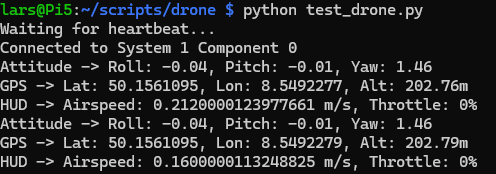
The next example we send a MAVLink packet to the drone that will change the mode of the drone
import time
from pymavlink import mavutil

# Connect via udpin
connection = mavutil.mavlink_connection('udpin:127.0.0.1:14550')

print("Waiting for heartbeat...")
connection.wait_heartbeat()
print(f"Connected to System {connection.target_system}")

target_sys = connection.target_system
target_comp = connection.target_component

# Target mode string
chosen_mode = 'STABILIZE'

if chosen_mode not in connection.mode_mapping():
    print(f"Error: Mode '{chosen_mode}' is not recognized.")
    exit(1)

mode_id = connection.mode_mapping()[chosen_mode]
print(f"Resolved mode '{chosen_mode}' to numeric ID: {mode_id}")

# Send an outbound heartbeat to establish a clear return path for ACKs
connection.mav.heartbeat_send(
    mavutil.mavlink.MAV_TYPE_GCS,
    mavutil.mavlink.MAV_AUTOPILOT_INVALID,
    0, 0, 0
)

# Clear out any backlogged text or messages sitting in the buffer
print("Draining queue...")
while connection.recv_match(blocking=False):
    pass

# Send mode change command using the long-form format
print(f"Sending MAV_CMD_DO_SET_MODE for mode ID {mode_id}...")
connection.mav.command_long_send(
    target_sys,
    target_comp,
    mavutil.mavlink.MAV_CMD_DO_SET_MODE,
    0,                                         # Confirmation index
    mavutil.mavlink.MAV_MODE_FLAG_CUSTOM_MODE_ENABLED, # Param 1: Custom mode flag
    mode_id,                                   # Param 2: The actual mode numeric ID
    0, 0, 0, 0, 0                              # Params 3-7: Unused
)

# Listen specifically for the confirmation packet
print("Listening for COMMAND_ACK...")
timeout = time.time() + 3.0
ack_received = False

while time.time() < timeout:
    # Look for ANY command acknowledgment
    msg = connection.recv_match(type='COMMAND_ACK', blocking=True, timeout=0.1)
    if msg:
        print(f"Received ACK for Command {msg.command}. Result code: {msg.result}")
        if msg.command == mavutil.mavlink.MAV_CMD_DO_SET_MODE:
            if msg.result == 0:
                print("Success! Mode change confirmed by flight controller.")
            else:
                print(f"Rejected! Code {msg.result}")
            ack_received = True
            break

if not ack_received:
    print("No ACK received. Checking current vehicle status instead...")
    # Request a fresh heartbeat to verify if the mode actually changed anyway
    msg = connection.recv_match(type='HEARTBEAT', blocking=True, timeout=2.0)
    if msg:
        # Inverse lookup to find the text name of the custom mode currently running
        current_modes = [k for k, v in connection.mode_mapping().items() if v == msg.custom_mode]
        print(f"Current live vehicle mode is: {current_modes}")